
The Four Steps of Painting

Wouldn’t it be great if you could go straight from a blank canvas to a beautifully detailed painting in just one step? As much as I’m sure some people would love to skip the beginning and middle steps and go straight to the end, building layers in strategic ways is key to a landscape painting. Plus, having multiple steps takes a little bit of the perfectionism mindset out of the equation. You can add one ingredient to the recipe at a time instead of worrying about doing everything perfectly all at once. In this post, I’ll walk you through the four main steps for painting landscapes.
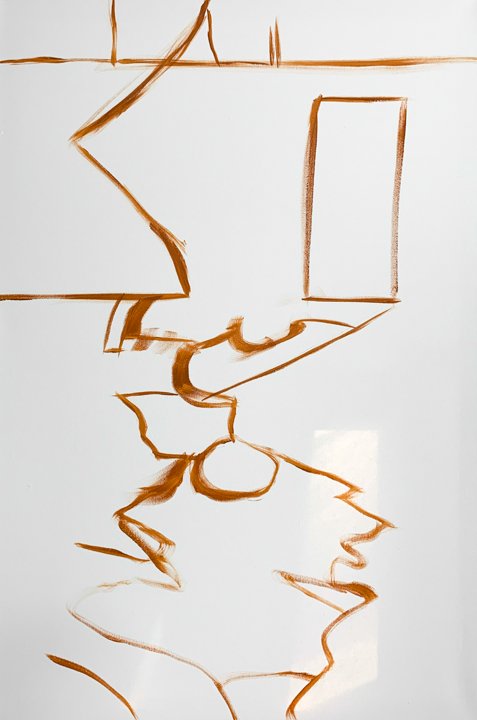

Step 1: The Outline
Doesn’t this look like a fun chaotic mess? I don’t know why, but it reminds me of those different shaped blocks that kids stack to make crazy looking towers. It might look random, but this outline is actually very strategically placed. These lines separate the light, medium, and dark parts of the painting. In the case of this particular painting, this is mostly separating the water from everything else. The water is much lighter than the rest of the painting, so I want to go ahead and establish these different areas. This step is important for creating general shapes, and laying out the pieces of the puzzle in the correct places.

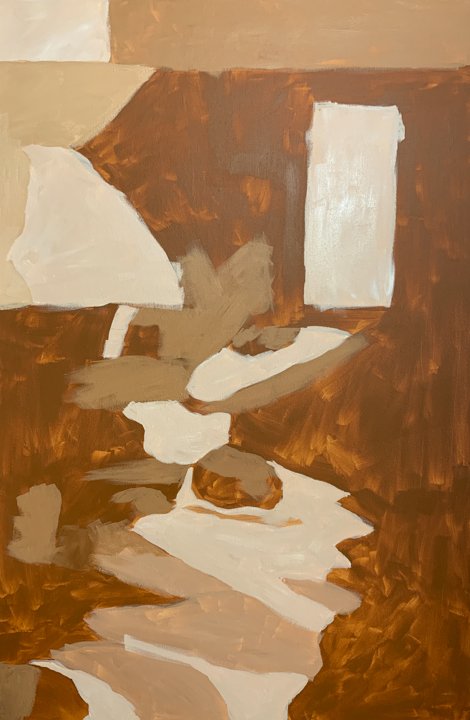
Step 2: The Underpainting
Ahh, no more blank canvas! The canvas is officially covered with paint. Why is it all different shades of brown, you ask? This step is all about establishing values. Value is how light or dark something is. Again, we’re just adding one ingredient at a time. Building layers with light paint on top of light paint and dark paint on top of dark paint really gives more depth to finished product. The light values seem to have a luminescent quality, and the dark values are deep and rich. It all starts with the underpainting. The warm browns that I chose for my underpainting will bring an overall warmth to the finished product.
Some people like to get pretty detailed with this step, to where it looks like a finished painting with a sepia filter on it. I like to just cover general areas, especially with landscapes, and add details in the later steps. How many details you add in this step is entirely up to you.

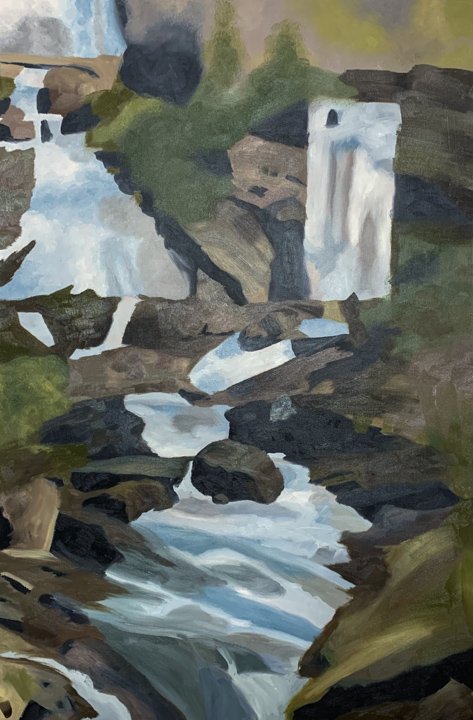
Step 3: Color Blocking
Now it’s starting to look like something! If you haven’t guessed it, this step is all about adding color. I always try to make the colors as accurate as possible, matching the reference photo, but I’m still only covering general areas. I’ll save the finer details for later. I have however added some gradients and color variation giving a little more clarity to where the different values are. Think of these as background colors. The details and even more color variation will go on top of this layer.

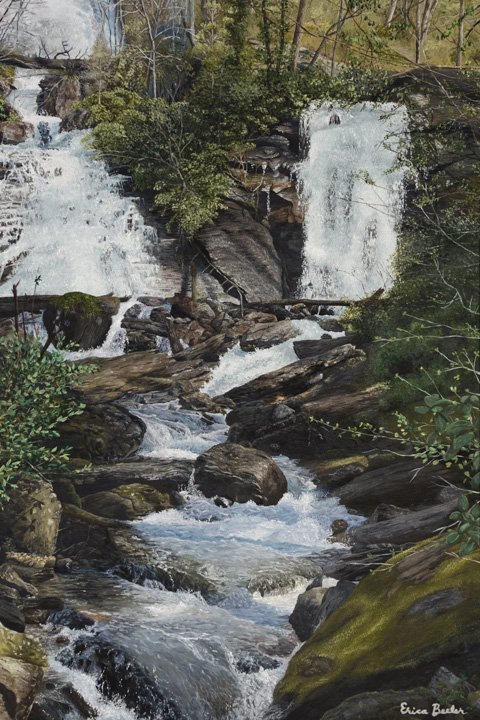
Step 4: The Details
Ok, yes, this the most time consuming part of the process. A lot of hours went in to this painting. I’ve added a lot of texture in the grass and rocks, highlights and shadows to create ripples in the water, and tons of branches and leaves. This is the hardest but most rewarding part of the process.
I can’t go into how I created every detail in this post, but I hope you can see how layering up the painting in this way helped the end result really come alive on the canvas. There is absolutely no way I could have gone from a blank canvas to the finished product in one fell swoop. Setting yourself up for success in a painting is so important, and these steps can certainly help you do that!
I hope you found this post helpful and inspiring! I would love to hear what you guys thought about it in the comments below. Want more helpful tips? Be sure to sign up for my email list to receive more content like this, and to stay in the loop about future online courses! As a bonus, when you sign up, you’ll receive my free guide to oil painting supplies (which includes my favorite paint colors for landscapes)! Happy painting, everyone!